CONTACT
VISIT
© Fyxer AI Limited. Company number 15189973. All rights reserved.
Begin your day with emails neatly organized, replies crafted to match your tone and crisp notes from every meeting.
© Fyxer AI Limited. Company number 15189973. All rights reserved.
© Fyxer AI Limited. Company number 15189973. All rights reserved.


Scheduling an email lets you send messages at the perfect time, even when you’re not at your desk. Whether you’re managing global clients, avoiding out-of-hours messages, or simply staying organized, Outlook makes it easy to schedule or delay sending emails.
You can schedule emails in Outlook on desktop, web, or mobile. Once you start using it, sending messages at the right time becomes second nature. It helps you stay organized, communicate clearly, and keep your day running smoothly.
The Outlook desktop app and website include one of the most flexible scheduling tools available, giving you complete control over when your email is delivered. It’s quick to set up and easy to adjust if plans change.
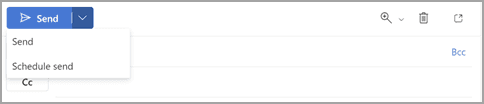
While composing a message, click the dropdown arrow next to Send, then choose Schedule send. This opens the scheduling menu where you can pick a time that suits you or your recipient best.
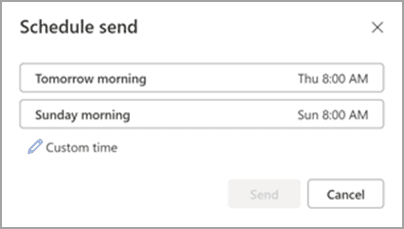
Select one of Outlook’s default options or set a custom date and time. Once confirmed, click Send and Outlook queues the message for later delivery. You can still review or edit it before it goes out.
After selecting , your message stays in the or folder until the chosen time. Outlook will automatically send it when the delivery time arrives, as long as your computer is on and connected to the internet.
© Fyxer AI Limited. Company number 15189973. All rights reserved.
This scheduling tool works for both personal and business accounts, though a few settings may differ between free Outlook.com users and Microsoft 365 subscribers. If the Schedule send option isn’t visible, check your account type or browser version.
Tip: If you prefer to shut down your computer, use Outlook on the web instead. Messages scheduled there are sent directly from Microsoft’s servers, so they’ll go out even if your device is offline.
The Outlook mobile app for iOS and Android lets you schedule emails with the same precision as the desktop version. It’s built for those who manage communication on the move and want their messages to reach inboxes at the perfect moment.
To schedule an email in the Outlook mobile app:
Open the Outlook app and start a new email. Add your recipients, subject line, and message as you normally would.
Before sending, tap the three dots (…) or the arrow next to the Send button. This opens additional settings, including the scheduling feature.
Choose Send Later from the menu. This allows you to pick when Outlook should deliver your message, rather than sending it right away.
Select the exact date and time you want your email to go out. Outlook shows both default time options and the ability to set your own.
Tap Send Later again to save and schedule the message. You’ll see it move to the Scheduled folder, ready to send automatically at your chosen time.
Your email will now appear in your Scheduled folder and send automatically at the time you’ve chosen. The feature syncs across devices, meaning you can edit or cancel the email later from your desktop or web app if needed.
Note: This feature is available for Microsoft 365, Exchange, and Outlook.com accounts, but it may not appear if you’re using Gmail or other IMAP connections within the Outlook app.
Plans change, and so can your emails. Outlook makes it easy to review, edit, or cancel a message you’ve already scheduled.
If you delete the email before the scheduled time, Outlook won’t send it.
Pro tip: If your message includes time-sensitive content, double-check your time zone settings before sending. Outlook automatically adjusts scheduled send times to match your account’s time zone, but when traveling or using multiple devices, it’s worth verifying.
Sometimes, scheduling doesn’t go as planned. Here’s how to fix the most common problems.
Scheduling emails is more than convenient. It’s a productivity tool that helps you manage your workload, control communication flow, and maintain consistency without staying tied to your inbox.
Here’s how it helps:
Knowing how to schedule an email in Outlook is one of the easiest ways to manage your inbox with intention. Whether you’re using desktop, web, or mobile, Outlook’s scheduling tools help you send messages on your own terms without missing deadlines or disrupting your workflow.
If you want to take inbox organization to the next level, Fyxer can help.
Fyxer drafts your replies, organizes your messages, and keeps communication on schedule so you can focus on the work that actually matters.
Not directly. Outlook doesn’t include a built-in recurring send feature. However, you can create a template and use reminders or rules to send it manually. Some users also integrate third-party tools like Power Automate to trigger recurring sends.
Only for the desktop app. If your computer is turned off, the email stays in your Outbox until you reopen Outlook. The web and mobile versions send directly through Microsoft’s servers, so they don’t rely on your device being online.
Check the Outbox (desktop) or Scheduled folder (web and mobile). From there, you can open, modify, or delete your message anytime before it’s sent.
Yes. Scheduling supports attachments of any type, but keep size limits in mind, typically 20MB for most accounts. For larger files, upload to OneDrive and insert the link instead.
The feature works for most Microsoft 365, Exchange, and Outlook.com accounts. If you’re using a third-party account such as Gmail or Yahoo in Outlook, scheduling might not appear.